8.6 Services
The services tab shows the services of the device and contains the following subsections:

The services tab shows the services of the device and contains the following subsections:
- TELEMETRY AGENT: device telemetry sent to a remote server;
- IPSEC: encrypted virtual private network (VPN) configuration.
- API: application programming interface configuration.
- OPENVPN: shows the open-source software application that implements a virtual private network (VPN).
- SER2NET: network-to-serial proxy;
Telemetry agent
Having data about the device helps to easily maintain it. Telemetry agent gathers information in a compact and easily decodable way. It uses UDP packets therefore only a small overhead is introduced.
However, UDP does not guarantee the arrival of sent packets therefore not every message might reach the server saving these messages.
To start using a Telemetry agent a user should configure and enable it. Four options are available:
- Enable agent;
- Server address;
- Port (UDP);
- Period (s).
Every time the timer of period length expires, a message is sent to a server of the configured server if the service is enabled.
The telemetry agent doesn’t start as a service if the Enable agent checkbox is unchecked.
Enabling the agent and saving the configuration automatically starts the process with the new configuration.
IPsec
Background
WCC Lite supports ipsec VPN and thus can deliver data securely over encrypted links. To establish ipsec vpn, a connection definition must be created by entering the appropriate configuration settings.
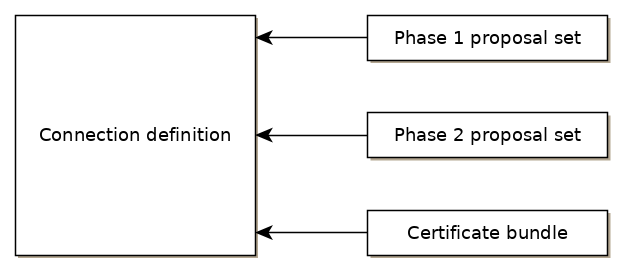
For advanced connection description auxiliary settings sets can be defined. They can be joined to the connection and can be reusable several times according to the need. Each configuration record is identified by a unique name, which is assigned at the time of creation. The following diagram shows the relations between connection and auxiliary sets.
Ipsec settings
Connection description
Options supported by WCC lite are described below.
| Item | Type | Description |
| Gateway | string | Host name or IP address of the remote peer. |
| Type | selector |
Tunnel mode: full packet encryption, covers host-to-host, host-to-subnet, subnet-to-subnet situations or transport mode: ip payload encryption, secures host-to-host data only. |
| Local subnet | string |
Specifies local network, in the form of network/netmask, for example 192.168.11.0/24 |
| Remote subnet | string | Specifies remote network at another side of a tunnel. |
| Authentication | selector | Pre-shared key or RSA certificate |
| Pre-shared key | string | Available if Authentication is set to Pre-shared key |
| Certificate set | selector |
Available if Authentication is set to RSA certificate. Selectable from the configured auxiliary set. |
|
Phase 1 proposal (IKE) |
selector |
Authentication-encryption schema, selectable from configured auxiliary set. |
|
Phase 2 proposal (ESP) |
selector |
Authentication-encryption schema, selectable from configured auxiliary set. |
|
Local ID |
string |
Specifies the identity of the local endpoint |
|
Remote ID |
string |
Specifies the identity of the remote endpoint |
|
Key exchange |
selector |
Sets method of key exchange IKEv2 or IKEv1. Default IKEv2. |
|
Exchange mode |
selector |
Main or aggressive. Available if key exchange is set to IKEv1. |
|
Use compression |
checkbox |
If selected a compression ability will be proposed to the peer. |
|
DPD action |
selector |
Controls the use of dead peer detection protocol, values:
|
|
DPD delay |
string |
Time interval in seconds between peer checks. Default 30. |
|
DPD timeout |
string |
Time in seconds after which peers consider it to be unusable. IKEv1 only. Default 150. |
|
Key lifetime |
string |
Lifetime of data channel in seconds. Default 10800. |
|
IKE lifetime |
string |
Lifetime of keying channel in seconds. Default 3600. |
Auxiliary settings
Phase 1 proposals - IKE/ISAKMP cypher suite components:
| Item | Type | Description | Note |
|
Encryption algorithm |
selector |
Encryption algorithm – 3DES, AES128, AES192, AES256. |
required |
|
Hash algorithm |
selector |
Hash algorithm – MD5, SHA1, SHA256, SHA384 or SHA512. |
required |
|
DH exponentiation |
selector |
Specifies Diffie-Hellman groups – 1,2,5,14,15,16,18 |
required |
Phase 2 proposals - ESP cipher suite components:
| Item | Type | Description | Note |
|
Encryption algorithm |
selector |
Encryption algorithm – 3DES, AES128, AES192, AES256. |
required |
|
Hash algorithm |
selector |
Hash algorithm – MD5, SHA1, SHA256, SHA384 or SHA512. |
required |
|
DH exponentiation |
selector |
Specifies Diffie-Hellman groups – 1,2,5,14,15,16,18 |
optional |
The following specification and topology map correspond to settings used in further configuration walk-through examples.
Creating a connection description
Site-to-Site VPN scenario

VPN connection details
Tunnel: demoo
IPSec peer: ipsec.vpn.net
Pre-shared key: thebigsecret
Mode: tunnel
Remote network: 10.10.10.10/24
Local network: 10.10.12.0/24
Local ID: wcclite
IKE authentication: aes256
IKE hash: sha256
IKE DH group: 5 (modp1536)
ESP authentication: aes128
ESP hash: sha1
If auxiliary data is needed, it is recommended to check or define it first.
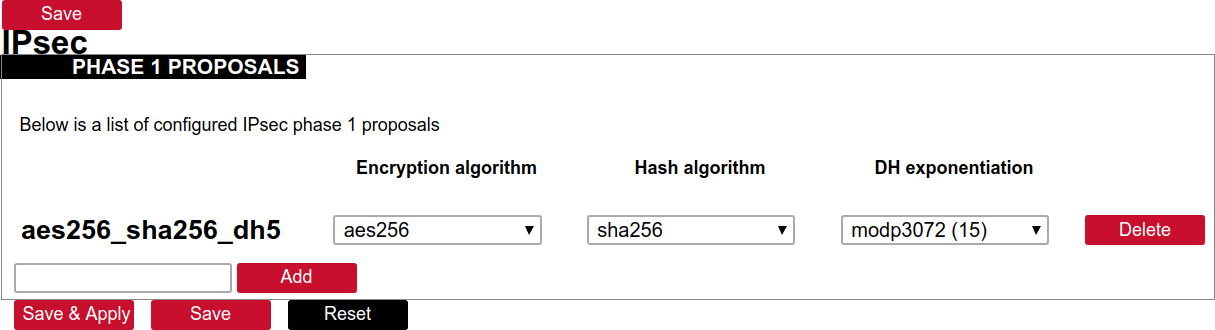
Creation of Phase 1 proposal
- Enter the section “Phase 1 proposals”.
- Create a new record by assigning a new name, for example, “aes256-sha256-dh5” and click the button “Add”.
- Choose corresponding values: encryption, hash algorithm and DH exponentiation.
- Push “save” to save the data.
Creation of Phase 2 proposal
- Enter the section “Phase 2 proposals”.
- Create a new record by assigning a new name for example “aes128-sha1” and click the button “Add”.
- Choose corresponding values: encryption, hash algorithm.
- Push “save” to save the data.

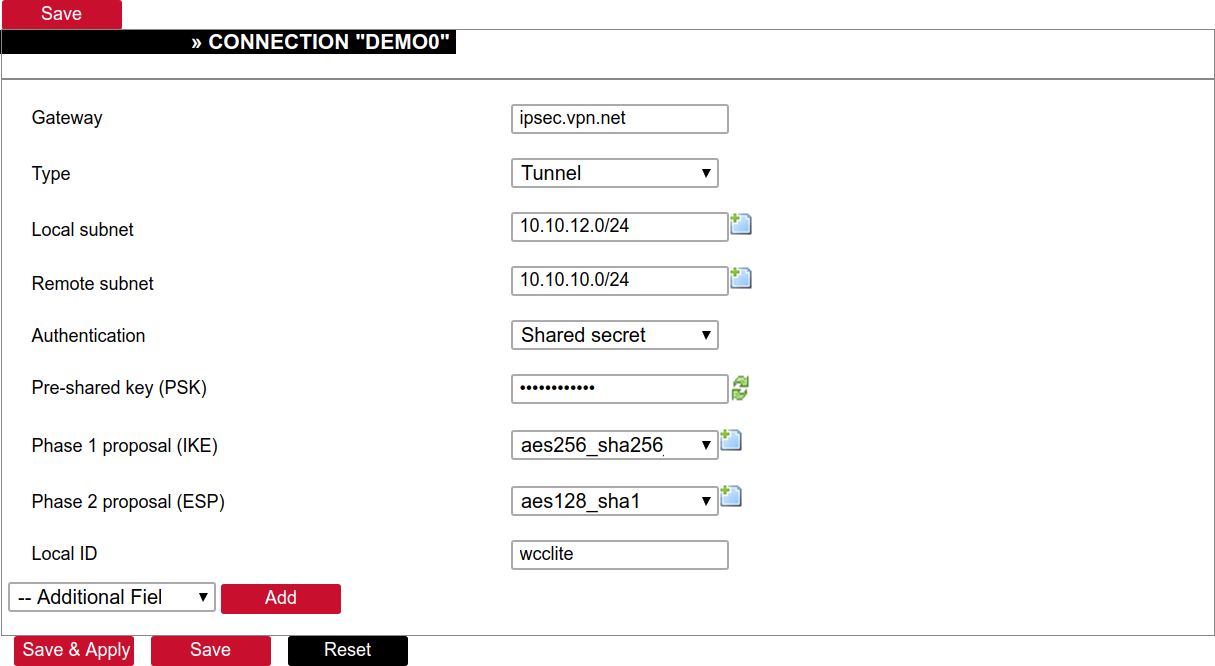
Creation of tunnel definition
Enter section connections
- Create a new record by assigning a new name (e.g.“demo0”) and clicking “Add”.
- Call a detailed form by pushing the button “edit”.
- Enter peer address into “Gateway”: “ipsec.vpn.net”.
- Ensure “Type” is set to: “Tunnel”.
- Fill local subnet to: 10.10.12.0/24.
- Fill remote subnet to: 10.10.10.0/24.
- Make sure authentication is set to: “Shared secret”.
- Enter Pre-shared key (PSK): thebigsecret.
- “Phase 1 proposal (IKE)”, choose a value: aes256_sha256_dh5.
- “Phase 2 proposal (ESP)”, choose a value: aes128_sha1.
- Locate the combo box “additional field”, select “Local ID”, then set the value to wcclite.
- Push “Save”.
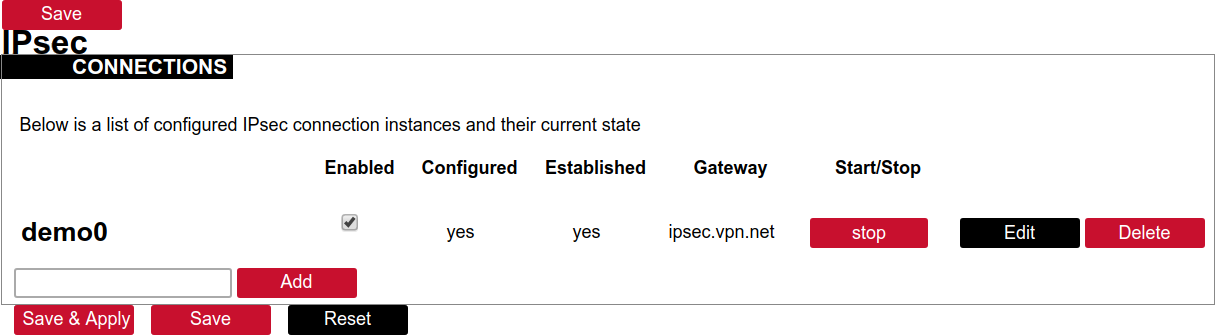
Activating the tunnel
-
Return to the section “connections”.
-
Check the checkbox “Enabled”.
-
Push the button “save & apply”.
-
Examine the indicator “configured”, it should be “yes”, if not, review the settings just entered.
-
The tunnel should be prepared for operation and will be established on demand.
-
Optionally, it is possible to establish tunnel operation by pressing the button “start”.
L2TP/IPsec
Because of the lack of confidentiality inherent in the L2TP protocol, it is often implemented along with IPsec. This is referred to as L2TP/IPsec and is standardized in IETF RFC 3193. The process of setting up an L2TP/IPsec VPN is as follows:
- Negotiation of IPsec security association (SA), typically through Internet key exchange (IKE). This is carried out over UDP port 500, and commonly uses either a shared password (so-called ”pre-shared keys”), public keys, or X.509 certificates on both ends, although other keying methods exist.
- Establishment of Encapsulating Security Payload (ESP) communication in transport mode. The IP protocol number for ESP is 50 (compare TCP’s 6 and UDP’s 17). At this point, a secure channel has been established, but no tunnelling is taking place.
- Negotiation and establishment of an L2TP tunnel between the SA endpoints. The actual negotiation of parameters takes place over the SA’s secure channel, within the IPsec encryption. L2TP uses UDP port 1701.
When the process is complete, L2TP packets between the endpoints are encapsulated by IPsec. Since the L2TP packet itself is wrapped and hidden within the IPsec packet, no information about the internal private network can be gathered from the encrypted packet. Also, it is not necessary to open UDP port 1701 on firewalls between the endpoints, since the inner packets are not acted upon until after IPsec data has been decrypted and stripped, which only takes place at the endpoints. A potential point of confusion in L2TP/IPsec is the use of the terms tunnel and secure channel. The term tunnel refers to a channel which allows untouched packets of one network to be transported over another network. In the case of L2TP/PPP, it allows L2TP/PPP packets to be transported over IP. A secure channel refers to a connection within which the confidentiality of all data is guaranteed. In L2TP/IPsec, first IPsec provides a secure channel, and then L2TP provides a tunnel.
API
The firmware of the WCC Lite features a built-in API which is accessible via the web interface.
As of version 1.2.11, it does not implement any access restriction features apart from those provided by the firewall functionality.
Individual API endpoints can be enabled or disabled via the web configuration interface at Services->API.
All endpoints are disabled by default.
Available API endpoints are shown in the table below.
Table. Available API endpoints:
| Endpoint | Description |
|
/api/version |
Version of the API |
|
/api/actions |
List of available points |
| /api/syncVersion |
A version of the sync service |
|
/api/sync |
Protocol hub configuration sync (name=”file”)* |
|
/api/syslog |
Prints out the syslog |
|
/api/systemInfo |
General system info |
|
/api/gsmInfo |
GSM modem information |
|
/api/devices |
List of configured devices |
|
/api/device/info |
Device information (name=”device_alias”)** |
|
/api/device/tags |
List of tags on a particular device (name=”device_alias”)** |
|
/api/device/tag/value |
Tag value (name=”device_alias”, name=”signal_alias”)** |
|
/api/tags |
List of configured tags |
|
/api/sysupgrade |
Firmware upgrade (name=”file”)* |
* Endpoints accepting files
** Endpoints accepting field data
The API accepts data and files as POST requests encoded as ”multipart/form-data”.
OpenVPN
OpenVPN Instances
The primary goal is to get a working WCC Lite tunnel and establish a basic platform for further customization. Most users will require further configuration tailored to their individual needs. If you are creating an OpenVPN server (either type), you must create security certificates using the instructions below. If you are using OpenVPN as a client, the required certificates should have been provided with your configuration details. OpenVPN can be configured either by using the WCC Lite Web interface or uploading the OVPN file containing the necessary parameters. OpenVPN will automatically attempt to load all *.conf files placed in the /etc/openvpn folder. Several OpenVPN recipes are suggested containing the most used configurations that may only require minor changes. If a user intends to set up OpenVPN without an OVPN file, it is highly advised to use these recipes and tweak them up to individual needs.
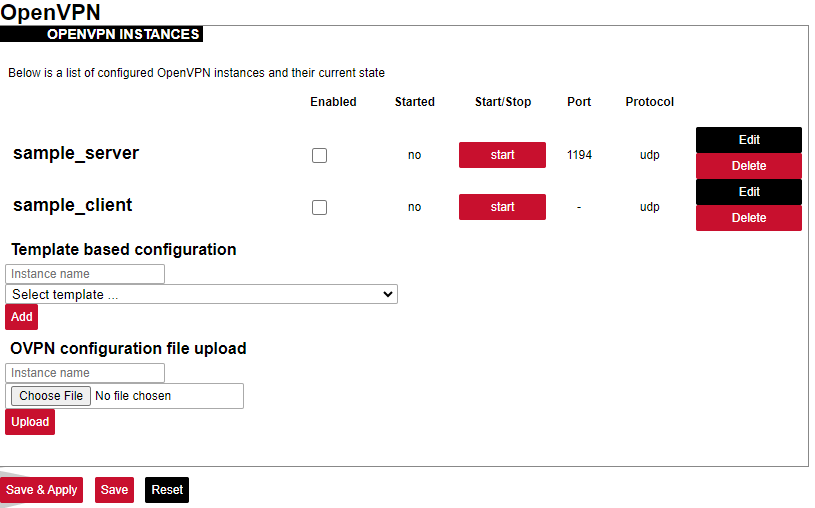
The OpenVPN instances page contains parameters to be configured.
Enabled: Flag to specify if a particular configuration should be enabled;
Started: Specifies if a particular configuration has been started by OpenVPN;
Port: Specifies the listening port of this service;
Protocol: A standard that defines how to establish and maintain a network connection: UDP - User Datagram Protocol, TCP - Transmission Control Protocol.
More parameters for every instance can be changed by pressing the Edit button, configuration can be removed with the Delete button. Pressing Edit takes the user to the main configuration screen containing the options usually used in particular OpenVPN recipes. To make more specific changes user should further select Switch to advanced configuration.
OVPN files contain configuration in a textual form therefore changing parameters requires having prior knowledge about different OpenVPN parameters. It is advised to use OVPN files, however, if the configuration has been pre-built beforehand and is used without further changes.
ser2net
The ser2net daemon allows telnet and tcp sessions to be established with a device’s serial ports. The program comes up normally as a daemon, opens the TCP ports specified in the configuration file, and waits for connections. Once a connection occurs, the program attempts to set up the connection and open the serial port. If another user is already using the connection or serial port, the connection is refused with an error message.
SNMP
SNMP (Simple Network Management Protocol) is an internet-standard protocol for managing devices on IP networks. SNMP exposes management data in the form of a hierarchy of variables in an MIB (Management Information Base).
WCC Lite supports SNMP service which is not added to the default build of firmware but can be installed as a module. It enables users to collect data on various parameters of the system:
• CPU time - time spent for calculations of various processes:
user - time for user processes;
system - time for system processes;
idle - time spent idling;
interrupts - time spent handling interrupts.
• CPU load average - CPU load average for 1, 5 and 15 minutes respectively;
• Disk usage:
total - the total amount of storage in the device (in kB)
available - amount of storage available to store data (in kB)
used - amount of storage used in the device (in KB)
blocks used percentage - blocks (sectors) used to store data in a disk (in kB)
inodes used percentage - the inode (index node) is a data structure in a Unix-style file system that describes a file-system object such as a file or a directory. Each inode stores the attributes and disk block location(s) of the object’s data.
• Memory usage - RAM usage statistics:
total - the total amount of RAM in the device (in kB);
available - unused amount of RAM in the device (in kB);
shared - shared amount of RAM between multiple processes (in kB);
buffered - refers to an electronic buffer placed between the memory and the memory controller;
cached - a portion of memory made of high-speed static RAM (SRAM) instead of the slower dynamic RAM (DRAM) used for main memory;
• Network interfaces:
MTU - maximum transmission unit to be sent over the network;
speed - the rate of network transmission;
physical address - unique MAC address assigned to a device;
tx/rx: byte, packet, drop, error count;
• System properties:
uptime - time since the device was turned on;
process uptime - time since the process has been started;
hostname - a label that is assigned to a device connected to a computer network;
name - name of the device (if defined);
location - location of the device (if defined).